North Point Keys Rig – 2014

By popular demand….

Here’s a look at our keyboard rigs at North Point, as of Spring 2014.

Most of our guys are now using a laptop-based mobile rig as their sound source. Computers’ power, stability and abilities have come leaps and bounds in the last few years, and the universe of sound palettes available via software synths are now seemingly endless and very affordable.

Behind us are the days of having to lug a bunch of keyboards to a gig, or being at the mercy of whatever hardware board was at the church or venue at which we were playing. Searching for sounds was a total pain, and ultimately limited to each keyboards capabilities. And switching sounds in the middle of a song set was a herculean feat.

With the onset and evolution of programs like Apple’s MainStage, and its subsequent sequels (like current version 3), the ability now exists for a keyboard player to have an almost infinite world of sounds carried around in his or her backpack. Really only limited by the power of their computer and the depth of their pocketbook.

And so here we are, in early 2014, where the average cost of a decent hardware 88 note keyboard is about $3,000(+/-). And for the same price, one can acquire a brand new hefty Macbook Pro and a copy of MainStage ($30) and maybe even a few third party sound source plug-ins, and be off to the races using an old, out of date hardware board as a MIDI controller.

And you can surf the Internet and check email too. 😉

So I can learn a set of songs and program & tweak sounds before I even arrive on stage.

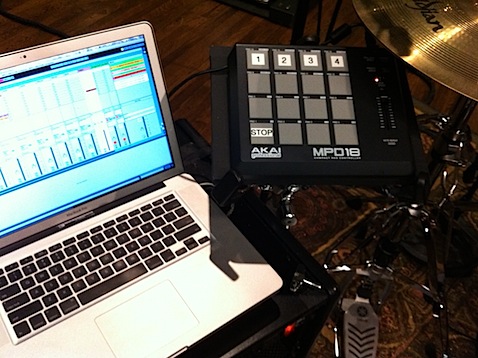
And when I arrive, it doesn’t matter what building or stage or venue or part of the country it is – I only need them to provide a controller (or lug one myself), and plug into its MIDI or USB port. EVERYTHING else fits in my backpack: Laptop power cable, Audio/MIDI-to-USB interface, Akai USB pad controller, and a few appropriate USB cables).

And even if I’m playing in the East Auditorium at North Point (‘cause I work there…) where all those cables & stuff already exist, I can still program & practice using my laptop in the comfort of my office or at my keyboard at home.

OK, that said, here’s a look at our current set up:

photo 1.JPG


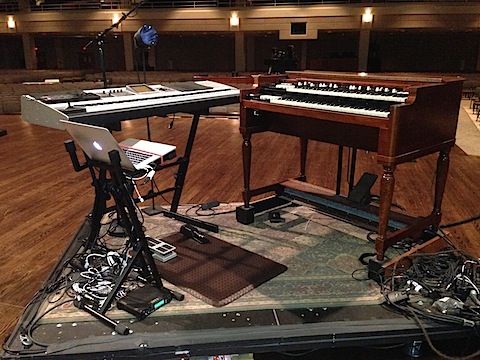
– Hammond B3 organ and Leslie. Yep, the real thing, circa late 1950’s. Can’t beat it. Take off the back cover and observe an amazing feat of analog electronics and spinning tone wheels. And stick your head in and take a deep breath: That’s 65 years of real wood, oil and vacuum tubes. It’s intoxicating.

She doesn’t get used quite as much any more due to evolving musical styles, but we’ll never get rid of her. The touch, the feel, the sound: It’s a love you never lose.

– Roland X8. All our campus stages bought one of these several years ago, as we liked the footprint, the internal sounds, the user-friendliness, ability to quickly switch patches via the Favorites feature, and the keyboard feel. It was also before laptop-based rigs became more popular, when folks were using the internal sounds, so having them on all stages helped eliminate as much learning curve as possible.

Now days, 99% of the time it’s being used as a MIDI controller for laptop rigs via its rear USB port.

BUT!! IMPORTANT: The X8 is also being used as the hardware backup to the laptop rig. Redundant redundancy!!!

Here’s the gist… While laptop rigs have come a long way, they are still not 100% reliable and fool proof. Trust me – I know from experience… The laptop rig, regardless of what software you use, can and will fail. Even if it’s reliable 99.99% of the time, the 0.01% time it fails will be when you need it most. Murphy’s law.

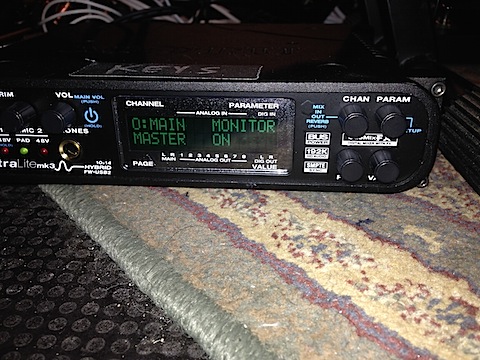
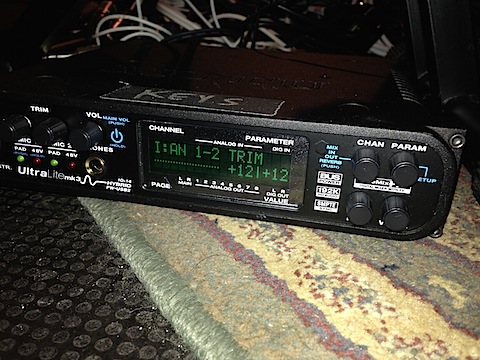
So…. we use a MOTU UltraLite Mk3 as the Audio Interface for the laptop rig, AND route the X8’s audio through it as well.

Therefore the MOTU is acting as a mixer (balancing the levels of the laptop sounds and the analog trim levels of the hardware X8), and no additional D.I.’s are needed for the X8.

Both sound sources are mixed and routed to the same Main stereo Outputs of the MOTU, and if you’re not using the internal sounds of the X8, you just keep the volume knob on the keyboard turned down. Super easy. So if the laptop freezes or dies or whatever, all you need to do is turn up the volume knob on the X8.

Or if you step on stage 30 seconds before you’re about to play the main piano part of “Faithfully” by Journey and realize that you forget to log in to your laptop and load MainStage after you restarted it after rehearsal, and the Producer is counting you down from “10, 9, 8, 7…”, all you need to do is turn up the volume on the X8 and play like nothing happened. No one will know except you and the Front of House engineer.

(Yeah, I did that. I was REEEEALLY glad I had a redundant hardware backup that day, and even a few times since.)

Obviously you don’t need a Roland X8. Any hardware keyboard with at least an internal piano sound will suffice.

– Wait, that’s it? Well, pretty much, yes. We’ve all but eliminated a second tiered keyboard from our East Auditorium rig simply due to the incredible versatility of MainStage. The ability to layer sounds, split keyboard zones within the software removes the need for a second synth-based keyboard.

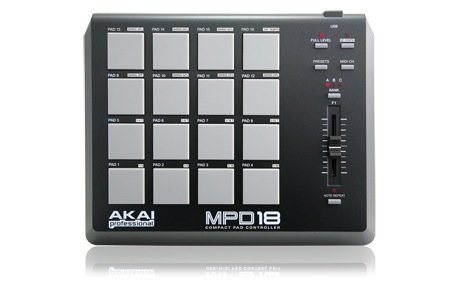
Well, one more IMPORTANT Peripheral… I would not use MainStage in a live format without an external USB controller, like the Akai LPD8. It, or a device like it, is ESSENTIAL!

There are other similar devices on the market, like the Korg nanoKontrol, or even Behringer USB flying-faders mixer, that allow the rapid changing of patches and adjusting of levels (volumes, envelope filters, tap tempo, etc.). All those physical aspects are easily assignable in MainStage.

You can see an Akai LPD8 placed on the keyboard chassis above the low octave.

photo 2.JPG

Our risers are on large casters and are moved backstage for the message. Hence the red bungee cord. I want my laptop to stay on the stand, not fall on the floor during riser transit. **Safety first, y’all….

– What’s on the Floor?

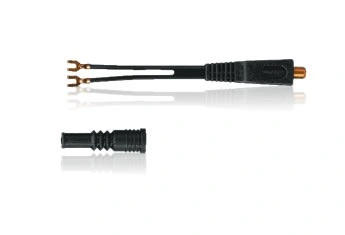
Well, lots of gack. Excuse the rats nest of power cables, audio snake, X8 audio cables, Firewire cord, USB cords & hub, 2 different laptop power supply types (new & old), mic cables & foot switch for my band leader/talkback mic, expression pedal, sustain pedal, and the MOTU.

Oh, and an anti-fatigue mat. ‘Cause a Sunday with 4 services and full rehearsals for 2 different sets of volunteer tech crew is a looooong 13 hours. And my feet were hurting. ‘Cause I stand. And you should too. ‘Cause only the drummer should be the only person sitting.

And while you’re at it, if you happen to have a real Hammond organ as part of your set up, I’d suggest building a 4” (+/-) riser for it. Having it at the right height when you stand and play makes it so much more fun to play!

– MOTU Notes:

Probably the biggest pain to set up was all the internal routing and level adjustment on the MOTU. Especially since its output is very hot when you use its balanced outputs.

We found this out when we started using an identical unit over at the drums position as an interface for our Ableton rig.

First, make sure your MainStage (or other software) is at the appropriate, unity levels. That’s kind of a no-brainer, but is worth repeating.

Now long story short, use the internal menus to do the following:

– Lower the output levels on the channels you want to use by at least 10dB. I found the easiest way was to slave all outputs (Main Outputs and any other analog outputs) to the Master level. Then you can adjust all outputs equally with just one knob. The terminology to the MOTU uses is “Monitor” on or off. On means yes.

photo 1.JPG

Now find a level of output that has your audio guy happy at FOH, with ample gain and some headroom to play around with. For us, that’s having the MOTU output down to about -10dB. That may then fluctuate a bit from player to player based on the levels of his or her laptop software.

The last thing to do is to adjust the input trim of the hardware board’s audio to match the laptop audio. Also, double check that its output channels are routed correctly.

For us, a satisfactory matching level was achieved by activating the -20dB pad and adjusting the trim up +12dB. (Basically -8dB overall).

photo 2.JPG

photo 3.JPG

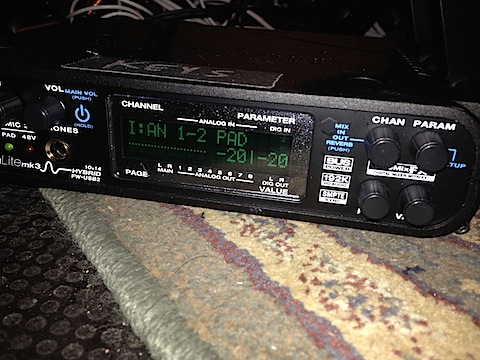
The reason that mixing these two sound signals at equal levels down the same set of channels is so imperative is so that if (more like WHEN) something does happen, all you need to do to correct the issue is simply turn up the volume knob on the hardware board. No frantic FOH person. No crazy levels. No accidentally muted channels. Just peace of mind.

Any questions?

The Wisest Decision Of Our Adult Lives.

As 2012 comes to a close, please let me share my family’s 2012 story with you.

It’s a story of denial, realization, conviction, humility, a key decision, change, discipline and an unbelievable outcome.

And as my wife Jen and I now look back on it, we agree that it was, without question, the wisest and most important decision of our adult lives.

So please let me share our journey with you, because our situation might be similar to yours. And just as a simple decision made a radical change in our lives, I hope & pray that it does in yours, if need be.

I thought our “Financial House” was relatively in order, but my incredible wife Jen did not have any peace as to where we were, either month-to-month or long term.  I kept telling her we were fine, but deep in my gut, however, I knew she was right. I was the ostrich, burying my head in the sand.

Like many of us, we were living above our means.  Not extravagantly, mind you.  We were not in terrible debt, and actually thought we were being wise in our decisions, like cutting cable in order to tithe like we knew we should.

But something was still not right, and peace did not exist.

At some point this past summer, Jen and her friend were chatting, and her friend was sharing how they had been in such dire financial straits, but how their lives had been changed by seeing a certified financial coach/councilor. His name is Parkey Thompson, and he is a Dave Ramsey “Endorsed Local Provider” here in Cumming.

After years of thinking we had our finances under control, as Jen and I discussed it, I came to the humbling (and embarrassing) realization that we needed the assistance of a capable, caring professional.

So two weeks later, I reluctantly joined my wife in his office for a “free 30 minute consultation”. Yeah, I was skeptical.  But my calloused attitude changed pretty quickly…

His calm and gentle Christian spirit helped put a mirror on our own situation. We were able to see where our money was being wisely spent, but more importantly, where it was “disappearing”.  

I realized that our so-called monthly budget was a sham, and our year-to year and long term plans were more of a punch line.  This was something Jen knew in her heart and was trying to tell me all along, but it took a third party to help wake me up.

So we decided to hire Parkey for the 6 month program. Because we honestly had nothing to lose.

And something radical happened….

He instantly became our friend, our advocate, our teacher and accountability partner.  

He helped us develop an actual plan to get out of debt, and long-term savings strategies to help us never return.

He helped us get excited about taking a brown bag of PB&J sandwiches instead of hitting the drive thru.

He helped us plan a monthly budget, assigning every dollar a name before the month even began.

He helped us realize the power of finite cash in an envelope versus an out-of-control debit and/or credit card.

I was worried that while trying to “get on the right financial track”, that we wouldn’t even be able to afford his services.  But in the first month, in addition to paying him an installment (1/3 of the fee), we actually put in savings MORE than his entire fee.  

In other words, in that first month, we quickly realized that we couldn’t afford NOT to hire him.

That was September.  

Today, we are out of credit card debt, have more money in savings than ever before, and actually have a strategic financial plan heading forward.

We have strategies to plan for not only month-to-month, but for quarterly, annual and long-term costs as well, like tag renewals, HOA fees, 1099 taxes, automobile replacement, retirement, etc…

There is more peace and communication in our marriage than ever before.  Our kids are learning to give, save and spend wisely.  And we are far more prepared for whatever bumps-in-the-road may come.

I finally realized this past year that I couldn’t have what was best for me or my family without getting my financial house truly in order, and that I needed a competent, kind, caring professional to accomplish that goal.

I say all that to say this – I care deeply about you, and want the absolute best for you and your family. That’s why I’m sharing our story. Hopefully it’s the friendly prodding that you might need…

And if any of our story rings true with you, I hope you take an honest look at your situation. Pray about it, and talk it over with your spouse, if applicable.

In case my friendly prodding causes you to take a step, here’s Parkey’s contact info:

Parkey Thompson
678.648.9940
coach@myfinancialfocus.net
www.myfinancialfocus.net

And don’t worry – this isn’t a pyramid scheme, and I’m not getting any kickbacks… You know I don’t roll that way. I just want you to experience the new-found financial peace that we’ve discovered through discipline and professional assistance.

Hopefully it will help you sleep better at night!  Especially Saturday nights… 😉

Reid

Homemade Coat Hanger HDTV Antenna

Last fall we faced the fact that we weren’t tithing like we knew we should – so we made some changes.

The biggest change for me was the decision to get rid of our satellite dish service, a cost of over $75 a month!

But one thing that helped ease that sacrifice was the realization that by using an over-the-air antenna, I could get almost all of the live local network TV stations in uncompressed HD with Dolby Digital audio. Yeah – ABC, CBS, FOX, etc…

In fact, depending on your distance from a signal’s originating source tower, you may be able to receive dozens of channels! And they look gorgeous!

AND – you can make this same antenna by yourself for under $20. Perhaps as low as under $10 depending on what parts you already have lying around.

(And yeah, it’s ugly as all get out, and therefore usually dwells out of sight behind a dresser. Sacrifices, people…)

Homemade Coat Hanger Antenna

I found all the instructions needed on this Web site: www.tvantennaplans.com

In fact, at the end of this post, I’ll again direct you to that site for the step-by-step instructions. BUT… first some of my findings, as well as a clarified list of items needed:

First, some important things to remember:

DIGITAL: As of 2009, all over-the-air television signals are digital (no longer analog). Therefore you must have a TV with a digital tuner. Most recent flat screen HDTV TVs have this feature, where most older tube TVs do not. If you have an older TV, you may need to purchase a digital converter from an electronics store (Fry’s, Best Buy) for about $50-80.

The homemade antenna works with our living room flat screen TV, but not with our bedroom’s 12 year old tube set. So if anyone want to come get a 19″ tube TV, it’s yours… 🙂

DISTANCE: Obviously the closer you are to a signal’s source, the stronger it is. I live about 50 MILES from downtown Atlanta, the site of most of our area’s source towers. I can receive most of their signals, but not all. And I’m only able to receive them because of height.

HEIGHT: If you are beyond 20 miles from a source tower, you will start having to manipulate the antenna’s location in order to compensate for the source’s loss of signal, and battle geographic and structural obstacles. Valleys and buildings will hamper your success, while height and an unobstructed line-of-site will help. Even placing the antenna near a window with a good line-of-sight helps.

I can not receive any signal when the antenna is in my living room, so I have it in our upstairs bedroom, and feed the signal down the existing coaxial cable line which terminates outside the house. It is then linked via a female-to-female adapter to the coaxial line which feeds the living room.

I tried putting it in the attic (and that’s where I’d suggest you try putting it!), but my home has a metallic-based TechShield insulation shield lining the roof, which unfortunately turns the attic into a Faraday Cage – no signal in or out! But hey, it makes for a great electric bill in the Summer…

DIRECTION: Because of my distance from the source towers, I just point my antenna South, and it’s a done deal. But if you are much closer to the towers, then you may find a need to alter the antenna’s direction for a more direct line-of-sight.

For a location map of your local towers, visit http://www.antennaweb.org and enter your Zip Code.

UHF vs. VHF: This antenna is excellent for UHF signals, which is fortunately the frequency band that most local stations broadcast on. Some, however, may broadcast on a VHF frequency. For example, my local NBC affiliate is VHF, and this model antenna is only capable of receiving that VHF signal within a 20 miles radius, and even then the antenna might only get the signal when located above the ground floor.

Again, your results will vary depending on distance and height.

SHOPPING LIST & TOOLS NEEDED:

– Piece of 2×4 wood, minimum 3.5′ in height. (Many types of boards will suffice – 2×4, 2×6, etc.)

– 10 wire coat hangers

– 16 Large-head 1″ screws (Pan-head self-tapping screw) 10 will be used on front, 6 on back to attach cardboard pieces.

– 16 Large-diameter washers (appropriate size to match screw)

– Electrical Tape

– 2 pieces of cardboard, approx. 14″x18″ each

– enough tinfoil to cover cardboard pieces

– 75 ohm-to-300 ohm matching transformer ($6 at Radio Shack)

75 ohm Transofrmer

– Drill

– Measuring Tape

– Pencil

– Wire Cutters

– Sandpaper

Alright, now that you have your tools and parts assembled, head over to www.tvantennaplans.com and launch in to Step #1

Here’s a look at the antenna:

(Before cardboard & tinfoil, using metal music stand as reflector)
IMG_2988.jpg

(My helper…)
IMG_2989.jpg

There you go. Good luck!

GEAR SPOTLIGHT – Akai MPD18 Controller

Ableton Live 8 is great. And so are the bevy of third party external controllers available to manipulate Ableton Live’s countless features and functions.

Akai is one company that has put some concentrated effort in developing a variety of USB control surfaces to send specific MIDI signals to Ableton.

They now have an arsenal of products – just head on over to http://www.musiciansfriend.com and search “MIDI Controller”. You’ll see a ton of products, and many with an Akai label.

At North Point, we used to use a Korg padKONTROL, but as it wore out, the cons of the way we needed to use the product (footprint size, button location) caused us to search for something else to use in its place.

The piece of gear we’ve since adopted for use is the $99.00 Akai MPD18.

Akai MPD18

I recently read the biography of Steve Jobs, and one mantra of his is clear throughout his life and leadership at Apple: “Simpler is Better”.

And in this – and many cases – I agree.

Our drummers are the one who start and stop songs via Ableton Live, and the MPD18 is a simple interface that allows them to glance over and easily find the appropriate button to launch the song or clip. And its single variable slider does allow the user to control any desired item, like being able to fade the volume of a loop or click, etc.

Now if you’re looking for more bells and whistles to manipulate more stuff during live performance, then Akai has some other controllers that may take your fancy, like the MPD26, and MPD32.

And if you dare, the APC Series… Can you say “overkill”?

Actually, the APC Series is meant for folks using Ableton Live in a far different fashion than we are. If anything, the APC Series beckons the spirit of Ableton Live’s original program intent – that of DJ’ing and song creation, and not that of single clips and scenes launching different songs like we do.


Now one obstacle to this (and any external controller) is placement.

While you may be blessed with a large spacial footprint to put a laptop stand, music stand and controller stand (and stick stand, beverage stand, etc…), we are not. We have a 8’x6′ riser on which to cram an entire drum set, audio snake, computer and audio interface, etc. So the small footprint of the MPD18 becomes ideal in our world.

We’ve made a pretty decent stand for it using a snare stand and small, cut piece of wood. (Yep, had to get out the power tools!). The wood was then covered by a miracle called “The Two Minute Matte Paint Job”.

Aka black Gaff Tape. 🙂

The finishing touch was to get out the labeler and make a “1”, “2”, “3” and “4”, just to help the drummer’s eye. For the vast majority of our services, these four buttons suffice.

On a recent more elaborate service (Night of Worship), the drummer wrote out the 10 or 12 song titles on sticky notes and stuck them to the buttons. Simple, (tacky), and effective! 🙂

MPD18 with drums

Also, as with many external controllers, the MPD18 is powered via the USB cable, so no need for another wall wart!

There you go!

What controller(s) do you use? Do you like ’em?

Crash Course: Ableton Live in Worship at North Point

Hi Kids!  Welcome to the “Using Ableton Live For Worship” crash course.

DISCLAIMER: This is NOT the be-all-end-all on how to use Ableton – there are a lots of ways.  This is simply a look at how we at North Point use Ableton for Click, Count-Off, Loops and Auxiliary Tracks playback.

Backstory:

Years ago we used to use Pro Tools for live playback of click & auxiliary tracks because of the ability to route to various outputs via external hardware. However we abandoned Pro Tools a few years ago and started using Ableton Live.

Ableton Live has abilities for live playback that are unparalleled in traditional Digital Audio Workstations (DAW).  For the reasons we’ll discuss below, Ableton Live has become our new standard in playback of click & tracks for a live performance setting.

Although I do still use Pro Tools as my primary vehicle for creating loops, tracks, aux programming, composition for film, song editing, etc.  Some other guys are fond of creating in Apple’s Logic, which is also a great program.

But you choose the DAW that is most comfortable for you to use for creation. Then after completing the aux tracks & programming that will be used in live performance, just bounce the tracks to a WAV file, then import them into that week’s Ableton session.

While it is possible to create using the Arrangement view of Ableton, as it is relatively similar to the traditional linear-based DAW (Pro Tools, Logic, etc.), most of us feel it is still inferior in regards to creation.  Although I will admit, Ableton’s Arrangement view has come in handy as a quick edit or pitch-shift tool while sitting in a creative meeting.  There are some features Ableton has in Arrangement view that the other DAWs wish they could do half as well…

BUT, for live performance playback of click, count-off cues and loops, there is no equal to Ableton’s Session view.

FIRST, before we dive in, feel free to download our NPCC Ableton Template, the file I start with each week to build that service’s session.


NOTE: There are two different files linked, depending on which version of Ableton you’re using.


NPCC Ableton Template – Regular, Full Version


NPCC Ableton Template – Ableton Intro (aka “Light” version)

Hopefully the Template will help you make more sense of Ableton and its abilities.

(What are the differences between the REGULAR version and INTRO version, other than cost?  See here: Ableton Version Comparison)

But be warned!  Ableton’s functionality is high, but so is the learning curve!  It does not follow the thought process of most traditional DAWs, and the reigning in Warp feature has caused many to stumble in their faith… 😉

Fortunately there are lots of helpful training videos out there. We’ve learned a lot from YouTube!

And Ableton offers a free 30-Day trial, so go ahead and download it, open the attached Template and follow along with this crash-course tutorial.

http://www.ableton.com/download-live-trial

Ableton Advantage:  Session View is non-linear, which means your click and loop can play for eternity.

Ableton Advantage: In Session View, a song’s tempo can be changed without affecting the other songs in your set-list.  (HUGE bonus versus traditional linear DAWs)

The Session view consists of Scenes, Clips and Tracks.

Scenes are the master “go” control for each song. It’s also where you customize each song’s tempo.

Clips are the actual audio files associated with the song that you have created (loops, aux programming, count-offs, etc.). Clips for each song are arranged HORIZONTALLY in line with the song’s Scene.  (Not vertically, like traditional DAWs!!)

Tracks are the vertical “channel strip” down which the audio signal travels, and can be routed to the Bus or Output of your choosing.  Clips from multiple songs can travel down the same Track.

Under the Master column are the list of Scenes. Ableton’s programmers assume folks will use each session for just one song, and that these Scenes are just parts of one song (Vs, Cho, Brg, etc.).

But the worship & live performing community have discovered that these can be not only parts of one song, but completely different songs altogether.

So in our case, each Scene is a different song in the set – each with its own custom tempo. Triggering the Scene will launch all the associated horizontal Clips.

To change the name and tempo of a song, click on the Scene and type Cmd-R, or “Rename” under the Edit drop-down menu.

BE SURE to include the letters “bpm” one space after the numerical tempo!!  Other wise it will not change tempo.

Ableton Scenes

We then trigger these Scenes (aka Songs) using an external USB pad controller, and assign Scenes, Stop, etc. via Live’s MIDI Mapping feature (Ctrl-M).

There are dozens of USB controllers on the market. We’ve used the Akai LDP8, Akai MDP18, and Korg padKontrol.  Choose the price, size and features that are right for you.

Ableton and Akai MPD18

Controllers can be set up to be used as remotes via the Preferences / MIDI Synch window. Be sure to enable the Remote feature to make Ableton open to receiving messages from the controller.

Ableton Advantage:  Enabling the Warp feature (described later) in conjunction with your desired tempo will speed up or slow down your loops & tracks with little-to-no discernible change in the audio’s quality or pitch.

That is huge!  And it process the audio in real time, so if you want to speed up or slow down your song, just re-type the tempo and everything adjusts – instantly!

Clips:

You can drag-and-drop your audio files into the horizontal clips. You can always add additional Tracks in which to add your files.

Ableton Clips

We do many songs that have no programming at all (nothing but Click), a bunch with just an open-ended loop that cycles infinitely, and a small handful of songs that have dedicated linear programming.

That means we may range from no Track channels used on one song, to 4 or 8 or more on another song!

As a rule, we try to avoid linear programming (aka. Pre-Recorded tracks) on worship songs if at all possible.  Linear programming means you NEED to start at the right time, which can unfortunately stifle a Worship Leader.  Instead of saying something meaningful between songs, they are paralyzed, listening for the count-off.

For this reason, out of all the worship songs we that are in our current repertoire, only 3 songs have actual linear tracks. In those cases they are some programmed strings, etc.  That’s an extremely low percentage! Just 3 worship songs!

Special songs, like Openers or Closers are a bit different, and we’ll add linear programming – but only if the song really, really needs it.  Again – slave to a count-in and aux tracks means more room for error… 😉

If you have multiple Clips traveling down one Track and desire a volume change to normalize the Clip volume levels, do NOT use the Track’s level. Instead, each Clip has a window with a ton of customizable controls, including that particular clip’s volume.

Ableton Clip edit window

Ableton Advantage:  This window also allows you to TRANSPOSE your audio file in real time without negatively affecting the speed of the audio file (when Warp mode is enabled).

Ableton Advantage:  This window also allows you to LOOP an audio file, so it will play, well, forever!  This is perfect for open-ended loops and a custom click track.

NOTE: Always label your programming’s file name to include the original tempo.  eg: “Mighty To Save LOOP 81”

Ableton’s Warp and Loop features can be very difficult to learn, and knowing the audio file’s original tempo will be extremely helpful.  The original tempo should automatically show in the Seg. BPM window, but may occasionally need to be manually corrected.

This is especially important when importing linear files without strong waveform transients, like pads & strings.  Ableton was originally designed as a DJ’ing tool, so it seeks spikes in the waveform – called transients – to determine an audio file’s source tempo.

When this goes awry, it can lead to a horrific warp experience. Trust me – it took us a LONG time to figure that one out!

One ESSENTIAL way to avoid most warp nightmares is to change your Preferences / Record Warp Launch to:

Loop/Warp Short Samples: AUTO

Auto-Warp Long Samples: OFF

Default Warp Mode: COMPLEX  (Live 8 full version only, not available on Live Intro)

Ableton Warp Preferences

Also, whenever possible, import WAV or AIFF files – not MP3 files – for your audio programming.

Unfortunately, when files are encoded to MP3, an extremely small amount of silence is placed at the beginning of the waveform, which drives the Warp function crazy.  To overcome this, you need to zoom into the beginning of the clip’s waveform, find the first transient, then right-click on the marker above the transient and chose “Make this 1.1.1”.

Total pain… Avoid if possible.

Finally, the click track….

NOTE: This Click track is already created in the NPCC TEMPLATE file.  The following is an explanation of what we did and how it works…

One reason we avoided Ableton for a long time was the horribly annoying click sound, and the inability to sub-divide it without falsely manipulating the tempo and time signature.

But then we had a brainstorm.  We loved the MPC Click sound from Pro Tools, and so we sampled one beat of it, and trigger that sampled file using Ableton’s drum machine, Impulse.

First, create and insert a short, silent WAV file into a Clip. Then drag an instance of Impulse on that Clip.

Then drag your desired click sample into one of the blank slots on Impulse.

Ableton Impulse Plug-In

The click audio file is then triggered as a MIDI event, complete with desired velocity, which can adjust the volume & timbre if you desire an accented downbeat.

div>

Ableton Impulse MIDI Note On Info

Another easy way to do this would be to record two different bars of your desired click sound at an average tempo, about 90 bpm – one bar regular quarter notes, and one with sub-divided 8ths.  Then insert that audio file with Warp activated, and it will warp to the tempo you entered in the song’s master Scene, just as though it was playing back a drum loop.

The only disadvantage to this method is the inability to adjust MIDI velocities, and thus add / eliminate / adjust the downbeat volume.  But that’s totally up to you!

Tracks:

The Tracks can then be routed to your desired output on just about any audio interface.

We first route all tracks to a Master Bus for each hardware output. This is especially helpful for us as we bring the Masters down -20 dB since we are balanced output from our MOTU hardware, and not using DI’s.  Kind of a pain, but an easy solution.

Ableton Tracks

Price = Features:

There are three different levels of Live:  Intro, Regular and Suite.

Suite ($700) includes a massive amount of plug-in instruments and effects, which are probably not needed if you already have other DAW software.

Regular ol’ Live ($450) is what we use. It has a few instruments and effects (again, that we don’t use), but does have the ability for infinite external hardware routing (imperative!) and the ability to Warp in Complex mode, which is most effective for tonal audio files (vocals, pads, strings, etc.)

Live Intro ($100) has most of the needed functionality of the regular version, except that it does not have Complex Warp mode, and is limited to just two outputs (one stereo pair) and only 8 scenes.

Again, hereis the Ableton Version Comparison

We know some drummers that have bought the Intro version to use on their own independent gigs for all of Live’s functionality, and just split the lines coming out of their laptop’s headphone jack. Click is routed to Left, and Loops to Right.

Alrighty – there’s your intro crash course – hope it helps!  Please feel free to ask any more questions as you learn and experiment!

And again, if you’d like the NPCC TEMPLATE, here you go!